The Table Saw – Set Up Instructions
Set Up Instructions
Installing the table saw in a a workshop always fills one with apprehension, have I bought right and how will it compliment my workshop. The table saw is a very desirable item for most woodworkers whether new to woodworking or an establish user.
Please note:
If viewing from Canada, France or United Kingdom articles selected to view may be substituted for an equivalent model if the selected model is not available in your country.
Purchasing for the first time or contemplating a change of the table saw look at the the latest products that are available.
Before delving into the various operations that can be undertaken it is a very good procedure to check the saw for the operation of the adjustments and correct alignment. For this you may require some tools that are not supplied with the saw, some you may already have if not consider acquiring them as they can also be a good addition to any workshop.
When using a table saw safety is a priority as with any piece of mechanical equipment so the following personal protection is a recommendation:
.
No loose clothing and sleeves rolled up
Safety glasses/googles.
Dusk mask as saw dust is a hazardous material.
A good dust extraction is a very good help.
Wearing of gloves is a definite NO NO
Where to stand when operating the table saw:
It would appear to stand directly behind the wood being cut, that is not advisable as there is a possibility of a kick back. This happens when the piece being cut becomes jammed between the spinning blade and the fence.
The blade is spinning toward the operator and the piece being cut is jettisoned toward the operator, this happens very quickly and the operator has no chance to avoid being hit. So the best place is to stand to one side and use a push stick to push the piece being cut.
Push Sticks
There are various designs of push sticks but the main aim of then is to keep fingers away from the spinning disc. They can be made from scrap pieces of wood or purchase very cheaply made of plastic and are considered to be a consumable item as it is often accidentally cut in use which is better than fingers being cut.
Riving Knife
The riving knife is part of the modern table saw, it is there to keep the piece being cut from binding on to the blade and to assist the cutting action to continue in a straight line. Pieces of wood have natural stress and have a tendency to follow the stress, this is one reason the Riving Knife is an asset.
Kickback Pawls
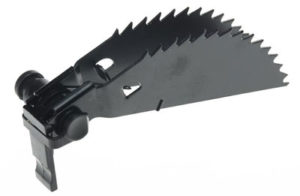
Kickback Pawls are not a standard item on all table saw but can be purchased and added. They are a spring loaded serrated pawl that is fitted after the Riving Knife, as the piece being cut passes under the pawl it lifts up and rests on the wood.
Should there be an attempted Kickback the serrated pawl stops the wood from shooting back towards the operator.
Featherboard
The featherboard is an accessory that is not supplied as standard but has a good application to keep the piece being cut pushed firmly against the fence. It will not eliminate the possibility of a Kickback it can assist in reducing it. There are several types of featherboard, fixing to the slot next to the blade and others are magnetic.
Saw Blades
Although the Table Saw is normally supplied with a blade it will only be a general purpose blade and so for more specific operations then investment in other blades blades will be necessary.
Blades with low tooth count are for rough cuts on possible large volumes of wood but the finish is not of a high quality.
Blades with a high tooth count give a mush better quality of finish, cut slower and able to cut harder woods.
Common Woodworking Terms
Kerf:
Kerf is the amount of wood that is transformed into sawdust by the cutting action of the saw. This is determined by the divergence of the teeth of the saw blade, the teeth are set larger than the blade thickness to prevent binding of the blade.
To determine the size of the kerf it is necessary to measure from one side of the teeth to the other, kerf varies from one blade to another depending on make and style.
Rip Cut
Is a cut made parallel to the wood grain.
Cross Cut
Is a cut made across the grain of the wood.
Kickback
Is when the wood being cut binds with the blade resulting in the piece being ejected towards the operator.
Tearout
This is the finish that is the resulting from the cutting blade leaving the cut.
Zero Clearance
Is where the cut being made has no kerf and results in tarot being reduced.
Dado
Is a carved slot across the grain of the wood, if made along the grain of the wood it is called a groove.
Rabbet
Is a section of the wood piece cut not to full depth either along or across the grain.
Setting up a Table Saw
SawBlade Changes
Changing the blade will occur when either the blade needs sharpening or it is the wrong type for the wood to be cut. It is essential that the following procedure is followed for safety reasons.
Disconnect the power source to the table saw, this must be done before any form of servicing work is to be carried out.
- Remove the table insert around the blade.
- This exposes the arbor holding the blade, there is a bolt locking the blade in position and on the other side an indent on the arbor.
- Using the two wrenches supplied with the table saw locate then and pull the wrench located on the bolt towards you and the other wrench push away from you.
- The bolt is a right handed thread.
- Slide the blade and washer off the arbor.
- Put the replacement blade on the arbor and with the washer on the bolt hand tighten the bolt. Using the two wrenches tighten the bolt, do not over tight as during operation of the table saw the bolt will naturally tighten being a right handed thread.
- Replace the insert.
Checking the mitre slot is parallel to the saw blade.
As all table saw have different adjustments to set the mitre slot to saw blades there are two videos to follow that go into detail the procedure:
Video 1
That video just gives one method the following is a Grizzly table saws reviews video but does show various methods of setting the table mitre slot and saw blade parallel:
Video 2
Checking the set of the fence
The fence is an adjustable straight edge to set a parallel distance between the blade and the fence.
- To check the alignment lock the fence in line with the mitre track, if the fence does not line up parallel with the track then the fence needs adjusting.
- Locate the fence locking screws near the locking handle and loosen the screw and adjust the fence to make it parallel and retighten.
- Ensure there is no movement in the fence by trying to move the fence from side to side, if movement is detected the tightening nut is at the far end of the fence and make a small adjustments on the nut unit the the movement is eliminated.
Fence Measurement Scale
Next to check the accuracy of the measurement scale of the fence scale.
- Set the fence at an accurate distance from the saw blade tooth to the fence.
- Compare it with the reading on the scale if different make the necessary adjustment until the reading is as set from the blade tooth to the fence.
- Please note that when a change of saw blade there can be a small change due to different Serf thicknesses.
Height of the Saw Blade
It is not recommended to run the saw blade at full height, as it can be unsafe. Set the blade to protrude above the piece being cut about 6mm/0.25”.
Angle of the Bevel
Angle of the Bevel is angling the saw blade over to make an angled cut on the work piece. On table saws with this feature there is means of setting the blade over one way or another.
But it is necessary to check that when it is a Zero the blade is at right angles to the table surface. The action of moving from Zero to 45degrees back to Zero and 45 degrees the other side should be a smooth action.
Calibration of a Good Saw Blade
If a saw blade is out of square it will mean the table saw will not cut true and possibly not straight. It is worth testing, even a new table saw or one in use for some time, the blade squareness it doesn’t take long and can be very beneficial.
Squaring Saw Blade Angle.
- Disconnect the power source to the best table saw.
- With the bevel angle set at Zero.
- Put a combination square sitting on the saw table main bed and against the blade face not touching any of the teeth of the blade.
- Then check that the square is touching the blade all the way with any gap appearing.
- If there is a space appearing then the blade is not square with the table.
- Move the bevel angle gear so that the square is flush with the blade.Reset the bevel angle indicator to zero.
Movement of the Saw Blade

To ensure that your saw blade has no deviation between raising and lowering the blade, to do this a dial indicator is required.
This is an attachment that measures very small movements in thousands of an inch. The amount of deviation may seem small and when only cutting with the blade at a low protrusion for relative thinner wood the deviation has little effect.
When cutting wood requiring the blade blade at full height then it can produce cuts that are not correctly matching up.
- To check the deviation set the dial indicator on the table surface with the dial plunger touching the blade surface set at a low position.
- Then raise the blade to the full height and any deviation will register on the dial indicator.
- The dial indicator measurement is in thousands of an inch and if the movement is excessive, above say 0.005” then some remedial work should be undertaken on the height assembly mechanism.
- Check all the securing mechanism nuts and bolts are tight, they can become loose due to vibration of use of the table saw, also look for damage of the height assembly.
Track of the Mitre
Whenever it is the intention of using the Mitre track the fence should not be used as it can impede off cuts from the Mitre operation and this can cause kickbacks.The mitre track can be an asset as it permits the use of sleds and jigs to hold the work piece at angles of an awkward set.
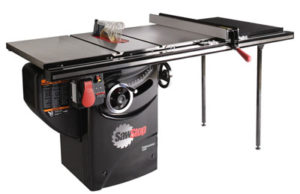
The Table Saw
Blade to push the work through
When cutting on a table saw it is advisable to not stand directly behind the cutting process. To enable one to stand aside to use a push stick, which can be purchased or made from scrap piece of wood, using it can at least prevent damage to a hand. When using a push stick it is advisable to completely push the piece being cut with it.
Looking next at some of the various cutting operations that can be made with the Table Saw, the most common is the Rip cut. This is the cut along the grain of the wood and is done a lot of the time to make the piece being cut to a size that is useable.
Selecting the correct Blade
When cutting on a high quality table saw it is good practice to have the correct blade to do the cut with the desired finish.
The best choice is determined by the number of teeth on the blade. Blades having a low tooth count are for fast rough cuts and therefore are unsuitable when a good finish is require.
Blades with a lot of teeth give a much nicer finish but are slower in the cutting speed. If it is a hard wood to be cut then it is necessary to have a high tooth count.
A general all round blade in common use is one with 40 to 60 teeth and will cover general cutting work and only be changed when a specific type of cut or wood is to be used.
Setting the Fence
When you are ripping wood it is a requirement that the fence is set correctly to the width of the rip cut. The calibration has be done as previously described so there should be no problem setting the cut required.
Bevel Angle Set
Not all saw cuts made on a high end table saw are vertical. There is a bevel function that allows cuts to be made at an angle. Just set the bevel angle (The bevel angle should be calibrated to give the correct angle). The fence measurement and ensure that the blade height is correct then cut using a push stick.
Cutting thick wood
If the wood being cut is in excess of 2” it is recommended to make several shallow passes. Increase the cut height on the blade in small steps.
Table Saw Featherboard
The featherboard is an optional piece of equipment and if purchased then some guidance into its use.
There are two main types: one fits into the mitre track and the other is magnetic. The featherboard is set on the side of the saw blade opposite the the fence. Because it has to be close to the blade so that it applies sufficient pressure. On the piece being cut to keep the wood in good contact with the fence.
.
How to use a featherboard: with power off the table saw, set the wood to be cut against the fence bring the feather board against the wood, with the feather finger are pointing the same direction as the wood will travel when being cut. There should be enough pressure which will be indicated by the feathers being bent slightly.
.
With everything set, remove the piece to be cut start the saw and start the cut the pressure from the feather board will stop any undue wandering.
Mitre Cutting
The action of cutting across the grain of wood is a mitre cut. This is achieved on a table saw uses the mitre tracks and employs a mitre gauge. Because when cutting mitres the fence is not required. Therefore on safety it should be moved away from the saw blade. Because it eliminates the possibility of a kick back.
.
Mitre gauges do vary in style but all must have similar settings. There is a form of locking the angle of the gauge. The angle can be set from 0 degrees to 45 degrees each side of the zero. The mitre gauge slides in the track that is parallel to the saw blade. It should slide freely down the track. If purchasing a new gauge it is essential that it will be the correct size for the track.
.
Before using the mitre gauge it should be calibrated so the any angle set on it will produce the correct saw cut.
With the saw blade set just above the wood thickness. Put the piece to be cut in front of the mitre. Then start the saw, with both hands holding the piece to be cut. Push firmly down the track to complete the cut.
It is not easy to use the mitre gauge when the wood being cut is long. The answer to that is to mount a sacrificial board to the from of the mitre gauge. Because this also allows the piece being cut can be clamped to it.
Cutting Angled Mitres
When cutting an angled mitre it can be done from either side of the blade. This ensures that when the cut is being made the mitre gauge leads into the saw blade.
Making a Compound Mitre
Having made successful application of the angled mitre the next step is to make a compound mitre. This consists of setting the mitre gauge and also setting the saw blade at an angle.
For this attention must be paid to the height of the saw blade. By angling the saw blade reduces the overall height. Therefore more blade will have to be raised to clear the piece being cut.
Making Repeat Cut lengths Cross Cutting
This involves using the fence, which is not previously recommended. The difference is that a piece of square wood is clamped to the fence. A distance away from the the starting position of the saw blade. Then the length of the repetitive cut is set from the saw blade to the clamped piece of square wood.
Bring the mitre gauge back level with the clamped block and set the wood being cut to it. When the cut is made it will be made and space enough for the cut piece to clear. Without interference and so avoiding possible kick back.
This process can be repeated to make as many pieces as require and all been the same length.
The following video will demonstrate this procedure:
3
Dadoes & Rabbets
Dadoes and Rabbets are a partial depth cut into the wood. Dado is made in the boundary of the wood piece. The rabbet is cut on the edge of the wood.
If the rabbet or dado is narrow. Then it can be cut in one pass by combining saw blades to the width required. Alternatively should the dado or rabbet be large then several passes will be necessary.
Setting up the Saw for Dadoes & Rabbets
Depending on how much material to be removed will determine how to make the cut. If there is a lot it is possible to combine saw blades in combination. To the width of the cut, it is preferable to make the cut in small steps.
Fence use
Rabbet or dado run parallel with the grain set the fence to where the cut is to be made. If the feather board is available set it to keep the wood in touch with the fence.
Mitre Gauge use
For this cut the fence is not required and can be removed. It is used for producing cuts across the grain.
Rabbet Cut
A rabbet cut along the the edge of wood with the grain. Suitable for making grooves for panes of glass or picture frames. The rabbet is produced with the saw blade set at the height to produce the required rabbet.
This makes producing this type of rabbet an easy process of setting the fence. The depth of cut and make several passes to achieve the depth and width of the rabbet.
Dado Cutting
Dado is cutting across the grain of the wood using the mitre gauge, means that several cuts will be made. Therefore compile several saw blades to the desired width of the dado.
This is a stack and the blades have to compiled in a set procedure. Because teeth of each blade is offset from each other.
Which are the best tool sharpening systems?…more…